Tuesday 31 December 2013

Linux process memory in detail

Linux process memory in detail


Linux provides detailed information about how a process using the memory. But it could be difficult for a System Admin to understand the difference among the items used by Linux.

There is a program as below:
#include <stdio.h>
#include <stdlib.h>
#include <sys/types.h>
#include <unistd.h>

void func()
{
    int *parray=NULL;

    if((parray=(int *)malloc(100*sizeof(int)))==NULL)
        printf("failed/n");
    else
    {
        pause();
    }
    return ;
}

int main()
{
        printf("pid: %d\n", getpid());
        func();
        return 0;

}

Run it and the process will pause there.

That’s the output of the 
#top –p [pid]


  • VIRT (VSZ): is the virtual memory for the process. But it does not mean the memory is used by the process now. For example, malloc just allocated some memory but the program hasn’t used it. The kernel will only map the virtual memory to the physical memory when it is really needed.
  • RES(RSS): the physical memory (not swapped)is being used by the program. Including the shared memory (shared lib or shard memory).
  • SHR: shared memory (shared lib or shard memory).  It does not necessarily mean that the entire library is resident. For example, if a program only uses a few functions in a library, the whole library is mapped and will be counted in VIRT and SHR, but only the parts of the library file containing the functions being used will actually be loaded in and be counted under RES.


Let’s look it into more detailed output using
#cat /proc/[pid]/status
Just focus on the memory section


  • VmSize: is the virtual memory VIRT (VSZ)
  • VmLck(KB): memory is locked and can’t be swapped. For example, the memory can be locked by munlock function in C.
  • VmHWM: the peak hardware memory usage by the process
  • VmRSS: the physical memory used by the process (RSS)
  • VmData: the program’s data segment. Related with program data
  • VmStk: the program’s stack segment. It contains automatic identifier, register variables, and function call information
  • VmExe: the program’s text segment. contains the executable program code and constant data
  • VmLib: Shared library code size.
  • VmPTE: Page table entries size.


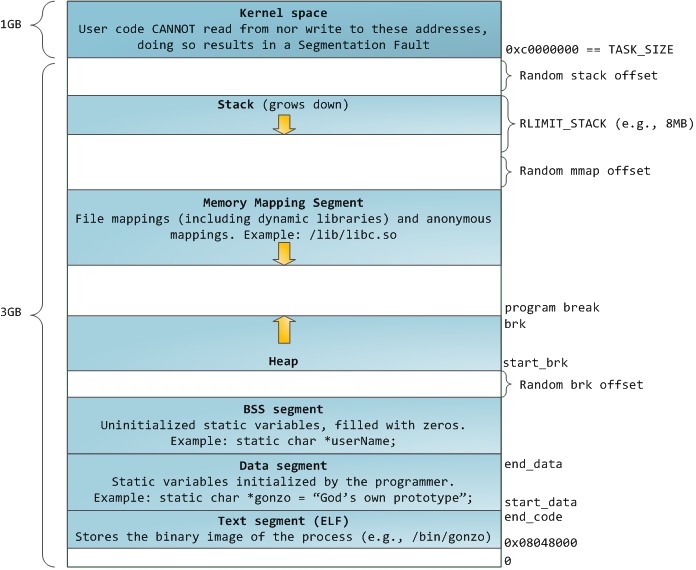
A program memory table can be shown as below (from internet)


Monday 30 December 2013

IP introduction


IP Introduction

This is the study note for TCP/IP illustrated Volume I: the protocols chapter 3.

The Internet Protocol (IP) is the principal communications protocol in the Internet protocol suite for relaying datagrams across network boundaries. Its routing function enables internetworking, and essentially establishes the Internet. IP, as the primary protocol in the Internet layer of the Internet protocol suite, has the task of delivering packets from the source host to the destination host solely based on the IP addresses in the packet headers. 

There are two features of IP:

  • Unreliable: it means by the protocol, the IP delivery is not reliable, you can’t relied on the IP to make sure it is delivered correctly. The upper layer protocol eg (TCP) will provide the reliability for applications.
  • Connectionless: it means the protocol itself doesn’t provide a virtual connection for IP peers. Every package delivery is independent of each other.

1.      IP header:


Explain of IP headers:
IP was designed decades ago and quite a few ideas are not used any more. Here is the explaination of each field. The important fields are marked as bold.

  • Version: IP versions , usually 4
  • Header length: usually be 5.
  • TOS: not very often used. Usually 0x00.
  • Total length: the length of the whole IP package.
  • Identification: the IP package’s Identification.
  • IP flags:  threee bits:
  • first is resvered,
  • the second means don’t do fragment on the package.
  • The third mean there are more fragments (not used very often) usually 0
  • Fragment Offset: the offset of the package start of whole IP datagram.
  • TTL:  Time to live field, usually the most router hops a package can usually travel. When it reaches 0, the router/host should discard the package.
  • Protocol: indicates the package type, eg TCP or UDP.
  • Header Checksum: the checksum of the IP header
  • Source Address: the source IP address of the package, who sent the package
  • Destination Address:  the destination IP address of the package. Who should receive the package.
  • IP options:  not very often used.


IP header sample


This is the IP package I captured


So we will see

  • Version: 4
  • Header length: 5
  • TOS: 000
  • Total length: 90  
  • Identification: 0x3125
  • IP flags:  000
  • Fragment Offset: 0.
  • TTL:  122
  • Protocol: 6 (TCP)
  • Header Checksum: 369F (correct)
  • Source Address: 163.189.94.81
  • Destination Address:  192.168.22.35
  • IP options:  not used.

 IP routing: 

IP packages are travelling and delivered in between hosts via the network, it travels hop by hop. The device which transmits the packages are called Router.
the router contains routing table. The routing table usually have the below information:
  • Destination : either it is a host or a network address
  • Next hop: the next hop router’s IP address
  • Interface : the physical interface the
  • Flag: indicates it is a router or an interface The router table may contains other useful information it needs.
Usually the router will try to match the destination IP with the routing table, if not found, it will match the network/netmask, if not found, it will use the default gw if there is or discard if not.  
  

Useful commands:

#ifconfig                     // the command to specify/show the interface IP information.
eg: ifconfig –a
     ifconfig eth0

              #netstat                               //show linux network relate info.
                eg: netstat –an                 //show all activated connections
                      netstat –l                       //show the listening ports.
                      netstat –r                     //show the routing table

Django - 1 Installation and Setup


Django -1 installation and setup

Django is a popular Python Web Framework (probably the most).it is very easy to develop web sites using Django. In this tuition, we are going to go throw basic steps how to deploy websites using Django.

Installation


Just download the Django package from the Django official websites:
https://www.djangoproject.com/download/ and untar it. In my case, I downloaded Django-1.5.1.tar.gz.
You will find a file called setup.py.  to install the Django, use command
#python setup.py install
By default, the installation will create a directory called django under your Django unzipped directory.

To verify if Django is installed correctly, you can go into python shell and
>>import django

>>django.VERSION
if you can get the correct output showing the django version. it indicates the django is installed correctly.


Setup the new project

Go to the directory you want to locate your project.
Use django-admin.py (which is located in your previous django/bin directory ) to set up the new project. As
#django-admin.py startproject testproject


Test the new project

run the command to start up the new project
#python manage.py runserver [ip:port]


MYSQL Management commands


  MYSQL Management commands

   Use MySQL client connecting to MySQL server.

#mysql –u [user-id] –h [hostname/IP] –p
*****
By default, without hostname, it will be localhost.

   Basic database information checking commands.

#show databases //list all available database; 
#connect [db-name]
#use [db-name]


   Create and delete db

#create database [dbname]
#drop database [dbname]


   Create , list and delete tables;

#create table [tablename] (field definition;)       //create the table;
#drop table [tablename]              //delete the table
#desc [tablename]                          //show the table structure
#show tables                                     //list all tables;

Data backup and restore

  #mysqldump -u [userid] -p  [database] [table]> [file]
   #mysql  -u [userid] [database] < [file]


Sunday 29 December 2013

HTTPS


HTTPS

HTTPS is the most common security version for http. Most of commercial web server and browser  provides the HTTP. Also almost all e-economic websites provides https connections.

HTTPS overview

Here is the architecture of HTTPS. Before sending the HTTP request to TCP stack, HTTPS will send it to a ‘secure’ layer end encrypted it using Asymmetric encryption key-pairs.

Typically, https’s url is something like https://websites/, by default the browser will use port 443 instead of 80. The traffic between your browser and webserver is binary dataflow and encrypted.

The shakehands processes


(From IBM websites)
  1. The SSL client sends a "client hello" message that lists cryptographic information such as the SSL version and, in the client's order of preference, the CipherSuites supported by the client. The message also contains a random byte string that is used in subsequent computations. The SSL protocol allows for the "client hello" to include the data compression methods supported by the client, but current SSL implementations do not usually include this provision.
  2. The SSL server responds with a "server hello" message that contains the CipherSuite chosen by the server from the list provided by the SSL client, the session ID and another random byte string. The SSL server also sends its digital certificate. If the server requires a digital certificate for client authentication, the server sends a "client certificate request" that includes a list of the types of certificates supported and the Distinguished Names of acceptable Certification Authorities (CAs).
  3. The SSL client verifies the digital signature on the SSL server's digital certificate and checks that the CipherSuite chosen by the server is acceptable.
  4. The SSL client sends the random byte string that enables both the client and the server to compute the secret key to be used for encrypting subsequent message data. The random byte string itself is encrypted with the server's public key.
  5. If the SSL server sent a "client certificate request", the SSL client sends a random byte string encrypted with the client's private key, together with the client's digital certificate, or a "no digital certificate alert". This alert is only a warning, but with some implementations the handshake fails if client authentication is mandatory.
  6. The SSL server verifies the signature on the client certificate. (optional)
  7. The SSL client sends the SSL server a "finished" message, which is encrypted with the secret key, indicating that the client part of the handshake is complete.
  8. The SSL server sends the SSL client a "finished" message, which is encrypted with the secret key, indicating that the server part of the handshake is complete.
  9. For the duration of the SSL session, the SSL server and SSL client can now exchange messages that are symmetrically encrypted with the shared secret key.

Server Digital Certificates

A digital certificate is an electronic "passport" that allows a person, computer or organization to exchange information securely over the Internet using the public key infrastructure (PKI). A digital certificate may also be referred to as a public key certificate. The digital certificate is issued by a trusted Certification Authority (CA). Server Digital Certificates are essential for HTTPS communication.
In real world, the server digital certificate is a X.509 v3 electronic copy.
It can be look like:


Usually the client will verify the below items:

  • Date:  checking if the digital certificates data is expired or not.
  • CA: the browser will contain a trusted CA lists. Only the trusted CA’s certificates can be thought as valid.
  • Signature:  the digital certificate’s checksum should be same as the trusted CA’s signature.
  • Domain verification: the digital certification’s websites should be exactly match the website the browser is accessing.