Showing posts with label Web Framework. Show all posts

Thursday, 3 April 2014

Django Web Design Step by Step – install and setup environment

the demo source code can be downloaded in github.
git@github.com:aaaaatoz/djangoweb.git


Download and Install Django

Django is the most popular Python-based web framework (https://www.djangoproject.com/), in this serial blogs, we are going to setup a website using Django step by step

Django can be downloaded from the official website, the current version is 1.6 but in the blog, we will use 1.5.5 for demonstration.

When Django is downloaded, unzip the file and you will get the files as below:

Then we will use the traditional python command to install the django infrastructure
#python setup.py install

After a few mins, you will get the Django framework installed. To test if it is ready just type
[root@hadoop1 Django-1.5.5]# which django-admin.py
/usr/bin/django-admin.py


Setup a Project

Setup a Project and Application for your website
In Django 1.5, project is the framework and application is the web container. We will navigate to a proper location and create a project as
#django-admin.py startproject djangoweb
You will find a directory called djangoweb has been created. In side the directory, there is a directory with the same name (djangoweb) and a manage.py file


Setup an Application

Now, make sure you are in the djangoweb (project not the subdirectory) directory and create an application called mysite by the below commands:
#django-admin.py startapp mysite
You will see a dictory called mysite has been created. Now You djangoweb project should look like:


Run Django Web Framework

We will explain the files and their function in the next a few blogs but now let’s enjoy Django by the command
#python manage.py runserver 0.0.0.0:8080


There should be no error and the web server is ready to serve the request.

Try using web browser to access it and you will see an Django Welcome page.


Sunday, 30 March 2014

integrate Django with Ngnix

In production system, it is very common that we will use Nginx as the reverse proxy and Python/Django as the backend application server.

here is the simple sample Nginx setting to integrate Django.

The Nginx's HTTP section

http {
     include mime.types;
     default_type application/octet-stream;

     sendfile on;

     keepalive_timeout 65;

     upstream djangoserver {
         server 127.0.0.1:8080;
     }

    server {
    listen 80;
    server_name localhost;

    location / {
       include fastcgi.conf;
       fastcgi_pass djangoserver;
    }
}

  • define upstream djangoserver, it can be a group of server for load balance. IP and port should be matched with the Django Application server
  • include the fastcgi.conf in the server/location sections.
  • pass the request to the application server : fastcgi_pass djangoserver;
we can use default fastcgi setting if no performance consideration but we need to change two lines. otherwise you will get blank urls when passing to Django.


fastcgi_param SCRIPT_FILENAME $fastcgi_script_name;
fastcgi_param QUERY_STRING $query_string;
fastcgi_param REQUEST_METHOD $request_method;
fastcgi_param CONTENT_TYPE $content_type;
fastcgi_param CONTENT_LENGTH $content_length;


#fastcgi_param SCRIPT_NAME $fastcgi_script_name;
fastcgi_param REQUEST_URI $request_uri;
fastcgi_param DOCUMENT_URI $document_uri;
fastcgi_param DOCUMENT_ROOT $document_root;
fastcgi_param SERVER_PROTOCOL $server_protocol;
fastcgi_param HTTPS $https if_not_empty;

fastcgi_param GATEWAY_INTERFACE CGI/1.1;
fastcgi_param SERVER_SOFTWARE nginx/$nginx_version;

fastcgi_param REMOTE_ADDR $remote_addr;
fastcgi_param REMOTE_PORT $remote_port;
fastcgi_param SERVER_ADDR $server_addr;
fastcgi_param SERVER_PORT $server_port;
fastcgi_param SERVER_NAME $server_name;

# PHP only, required if PHP was built with --enable-force-cgi-redirect
fastcgi_param REDIRECT_STATUS 200;


on the Django side, you will start the django with runfcgi option. sample start script as below:
python manage.py runfcgi method=prefork host=0.0.0.0 port=8080

Wednesday, 1 January 2014

Django – 2 Basic View and URL configuration

Django – 2 Basic View and URL configuration.

this blog just gives a very small and simple hello world style webpage over Django framework.
 

Define a function called hello

And save it to the testproject folder as helloworld.py

from django.http import HttpResponse

def hello(request):
return HttpResponse("Hello world")

this is the business logic of your webpage output.

Change the urls.py and let it call hello function.


    from django.conf.urls import patterns, include, url

    # Uncomment the next two lines to enable the admin:
    # from django.contrib import admin
    # admin.autodiscover()

    from testproject.helloworld import hello

    urlpatterns = patterns('',
        url(r'^hello/$','testproject.helloworld.hello',name='hello'),
    )
         
The most import line is url(r'^hello/$','testproject.helloworld.hello',name='hello'),


  • r'^hello/$' is the regular expression when you try to access the page via the browser
  • 'testproject.helloworld.hello’ is the [project].[module].[function]
  • name='hello' is just to give a name to the view.


The urls.py plays a very import role in Django framework, it mapps the url to the python scripts that provides the logic.

So when you run the server by python manage.py runserver 0.0.0.0:8080
And access the page by http://192.168.56.112:8080/hello/

You will get the page look like


Monday, 30 December 2013

Django - 1 Installation and Setup


Django -1 installation and setup

Django is a popular Python Web Framework (probably the most).it is very easy to develop web sites using Django. In this tuition, we are going to go throw basic steps how to deploy websites using Django.

Installation


Just download the Django package from the Django official websites:
https://www.djangoproject.com/download/ and untar it. In my case, I downloaded Django-1.5.1.tar.gz.
You will find a file called setup.py.  to install the Django, use command
#python setup.py install
By default, the installation will create a directory called django under your Django unzipped directory.

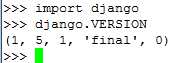
To verify if Django is installed correctly, you can go into python shell and
>>import django

>>django.VERSION
if you can get the correct output showing the django version. it indicates the django is installed correctly.


Setup the new project

Go to the directory you want to locate your project.
Use django-admin.py (which is located in your previous django/bin directory ) to set up the new project. As
#django-admin.py startproject testproject


Test the new project

run the command to start up the new project
#python manage.py runserver [ip:port]